
How to create a Telegram bot with BotFather
Register a bot with BotFather, explore its settings, and learn what you need to make it work.
What a Telegram bot is and how it works
A Telegram bot is a special account controlled by a program or an external service. It has a name, a photo, and a username, with a “bot” label in its profile. You can open a chat and send it a message, just as you would with another person.
With an ordinary account, a person decides what to write back. With a bot, the developer defines which messages the program responds to and what actions it takes. That program can be built specifically for your bot or provided by a ready-made service.
Bots can therefore do many different jobs. They can answer customer questions, take orders, send reminders, save notes, translate text, run quizzes, or publish channel posts.
Telegram’s official BotFather bot handles registration. Its built-in app lets you create a bot account, set up its profile, and get the access key needed to connect a program or service.
Register a bot with BotFather
You only need your regular Telegram account to register a bot.
-
Search Telegram for @BotFather, open its chat, and click the name at the top. In the profile, check that the username is BotFather and that a verification badge appears beside the name.
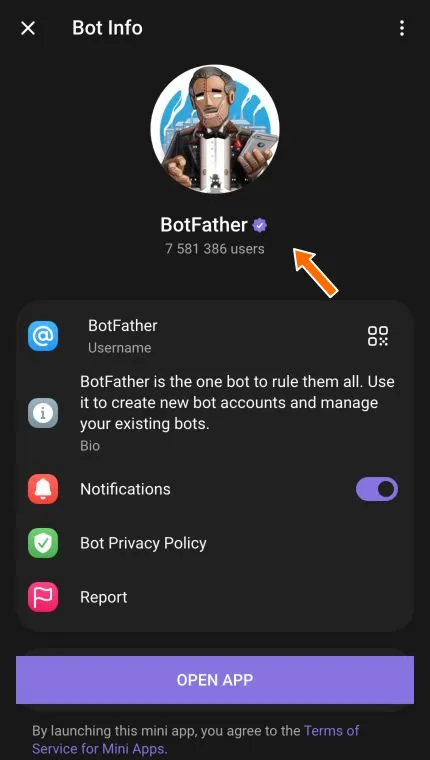
The official BotFather has a verification badge. -
Click Open App at the bottom of the profile.
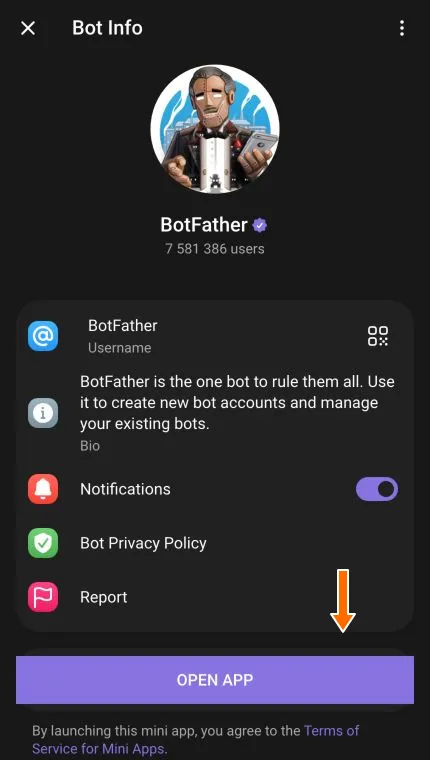
This button opens the app for managing your bots. -
Choose Create a New Bot.
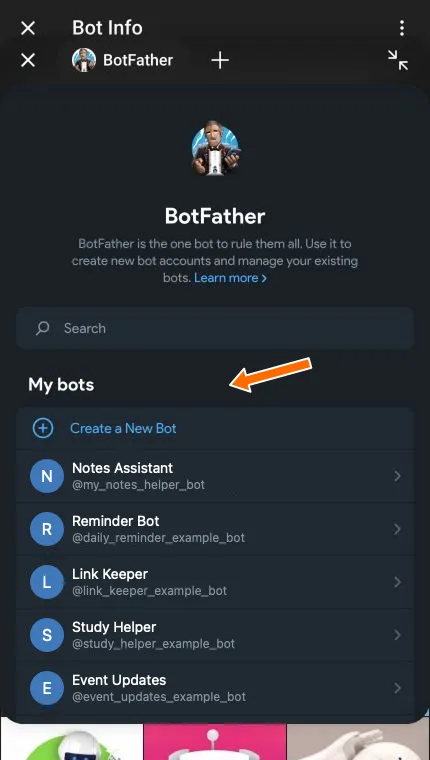
This opens the registration form. -
Enter a name in Bot Name, such as “Notes Assistant.” In username_bot, choose a username using Latin letters, numbers, and underscores, ending in
bot. For example, you could trymy_notes_helper_bot. A green is available message means the username is available. If it is taken, choose another one.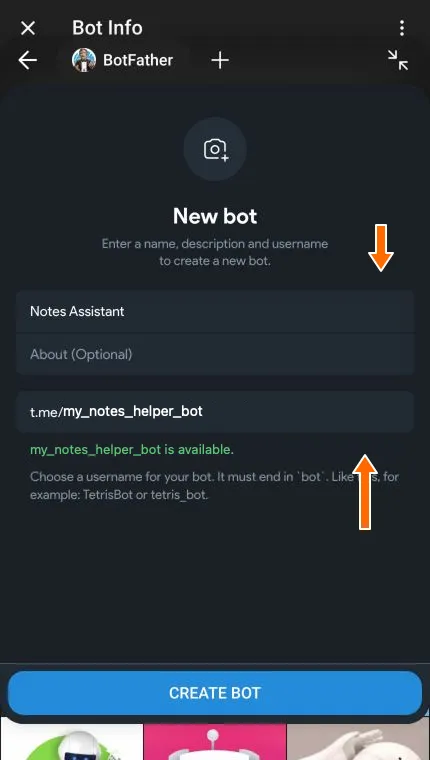
The name appears in chats. The username helps people find your bot. -
Click Create Bot.
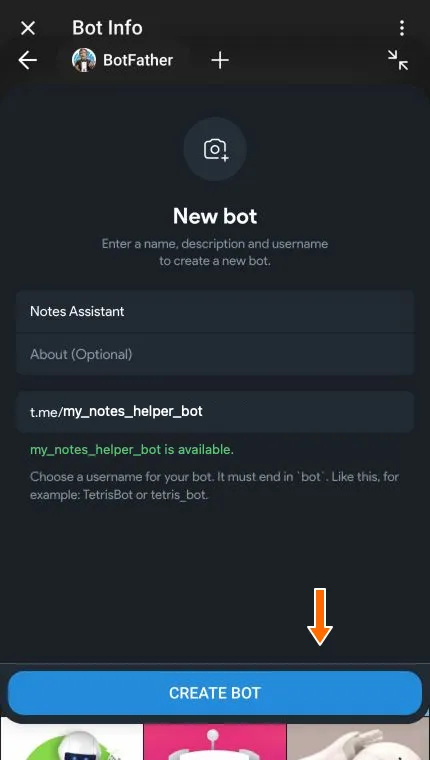
Creating the bot opens its management page. -
Click Copy to copy the access key. This key is called a token, and you will need it to connect a program or service. Keep it private: anyone with the token can control your bot.
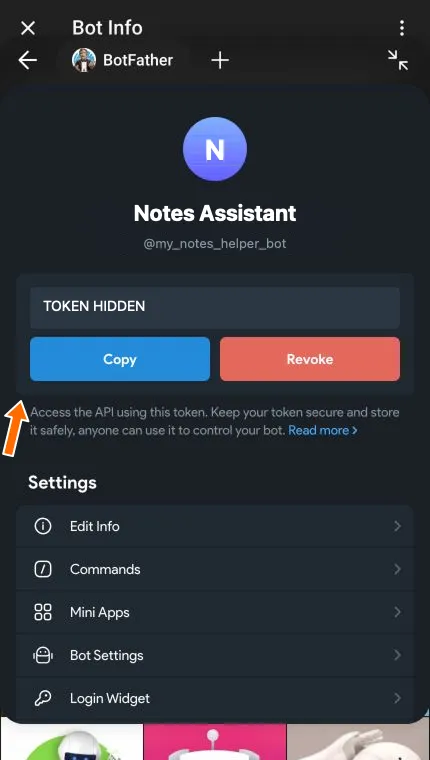
Copy copies the access token. It is hidden in this screenshot.
You now have a bot account and its token. You can add a description or go straight to choosing how to run your bot.
Add a description
A description tells people what your bot is for before they start a conversation. You can add it after registration.
-
Open Edit Info on the bot’s management page.
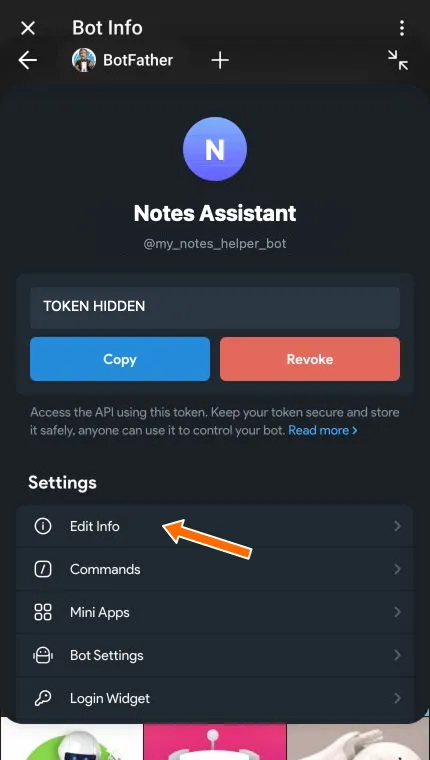
Edit Info opens the profile settings. -
In About (Optional), briefly explain what the bot does. This text appears in its profile. Below that, in Welcome message, fill in Enter bot description with a fuller explanation of what the bot will do. People see this description before they start chatting.
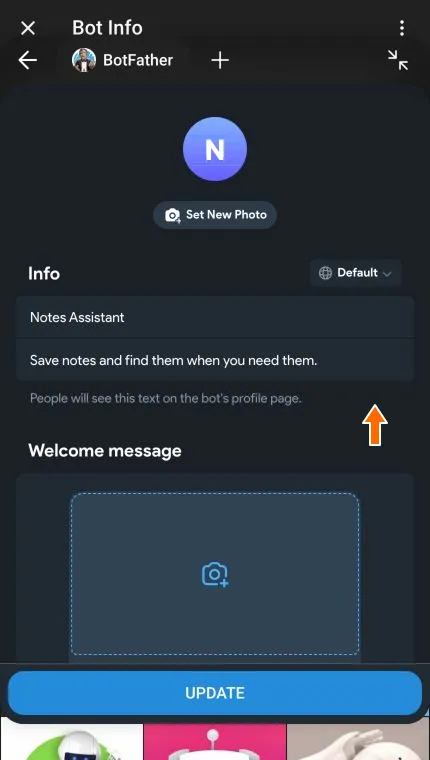
About appears in the bot’s profile. 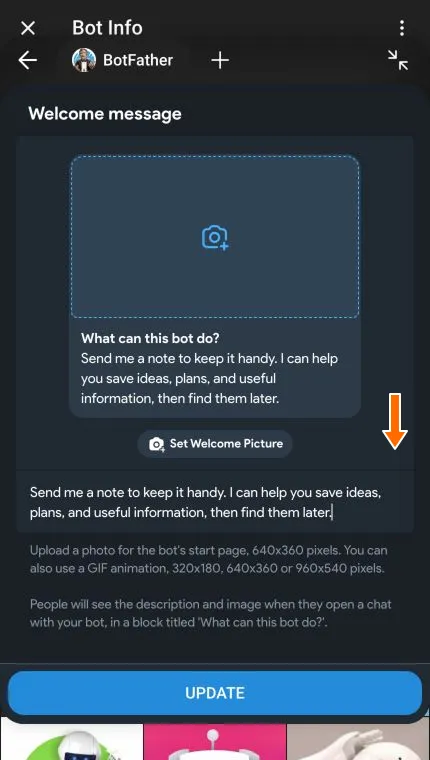
The form previews how the description will look in the chat. -
Click Update to save your changes.
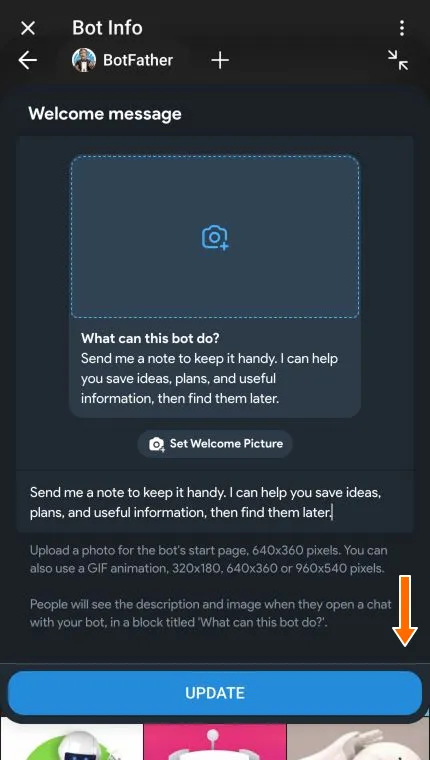
Saving takes you back to the bot’s management page.
BotFather settings
Bot Settings lets you choose where your bot can work, which permissions it requests, and who can use it. The program or service connected to your bot must support the features you enable.
-
Open Bot Settings on the bot’s management page.
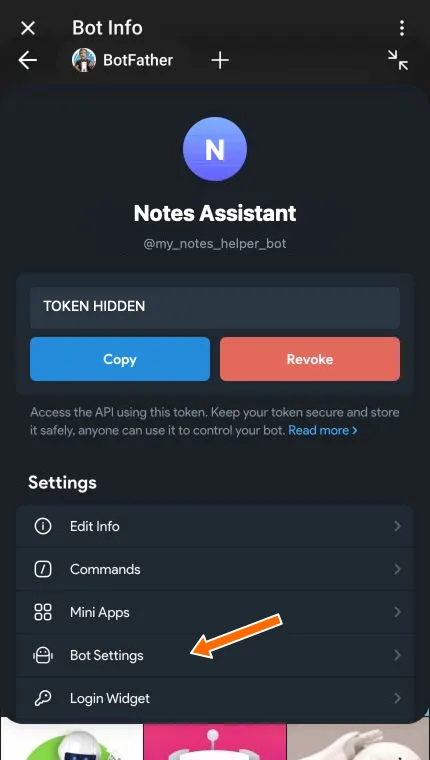
Bot Settings contains the bot’s modes and access settings.
Groups and channels
Allow Groups lets people add the bot to groups. Enable it if the bot will help group members or administrators.
Group Privacy controls which group messages the bot receives. When it is on, the bot receives messages directed to it, such as relevant commands and replies to its messages. When it is off, the bot can receive ordinary group messages too. A bot made an administrator receives group messages regardless of this setting.
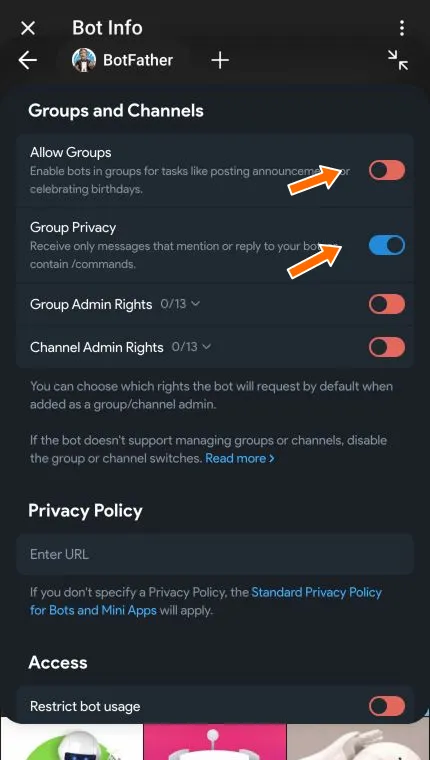
Group Admin Rights and Channel Admin Rights set the permissions the bot requests when someone adds it as an administrator. The administrator adding the bot confirms its access. For example, publishing in a channel requires Post Messages. Choose other permissions according to the bot’s job.
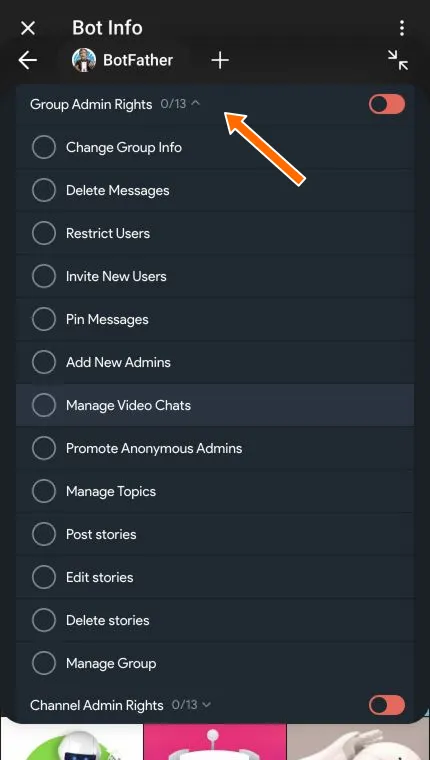
Group administrator rights: what each option means
- Change Group Info: change the group’s name, description, and photo.
- Delete Messages: delete messages.
- Restrict Users: limit members’ permissions or ban them.
- Invite New Users: invite members.
- Pin Messages: pin messages.
- Add New Admins: appoint other administrators.
- Manage Video Chats: manage video chats.
- Promote Anonymous Admins: use anonymous administration, with actions shown under the group’s identity.
- Manage Topics: create and edit group topics.
- Post stories: publish stories for the group.
- Edit stories: edit the group’s stories.
- Delete stories: delete the group’s stories.
- Manage Group: use administrative tools, such as viewing the event log.
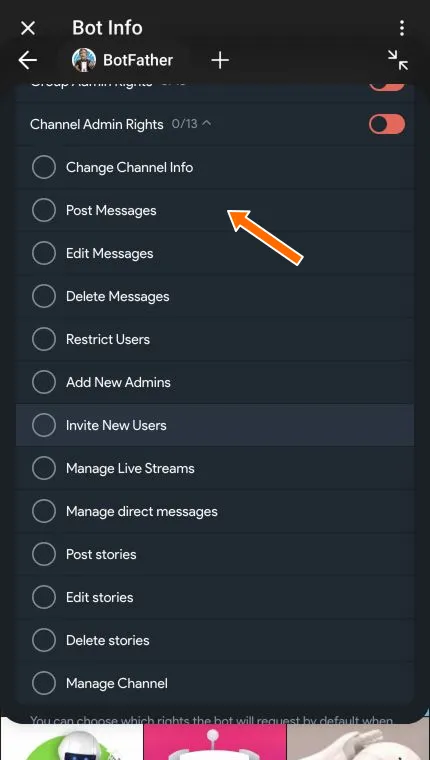
Channel administrator rights: what each option means
- Change Channel Info: change the channel’s name, description, and photo.
- Post Messages: publish messages.
- Edit Messages: edit posts.
- Delete Messages: delete posts.
- Restrict Users: restrict subscribers’ access to the channel.
- Add New Admins: appoint other administrators.
- Invite New Users: invite subscribers.
- Manage Live Streams: manage live streams.
- Manage direct messages: manage direct messages to the channel and suggested posts.
- Post stories: publish stories for the channel.
- Edit stories: edit the channel’s stories.
- Delete stories: delete the channel’s stories.
- Manage Channel: use administrative tools, such as viewing the event log.
Special modes
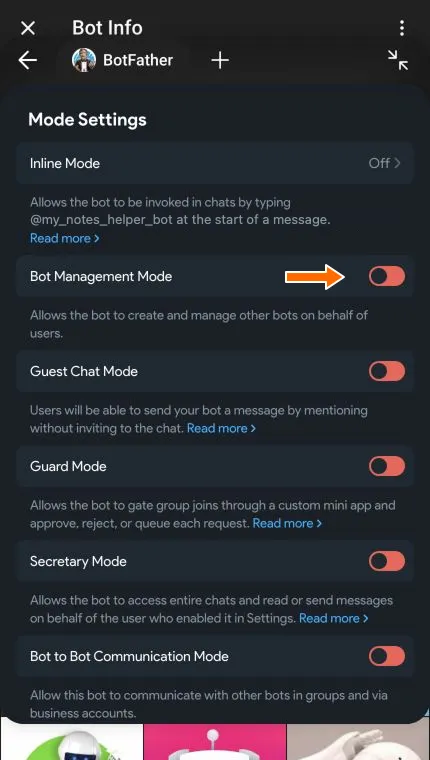
These modes serve particular tasks. Use them when the program or service connected to your bot supports them.
- Inline Mode lets people use the bot from another chat. They start a message with the bot’s username, choose a result, and send it to the conversation. This can be useful for finding images or translating text without leaving the chat.
- Bot Management Mode lets the bot create and manage other bots on behalf of their owners. A bot-building service can use this feature.
- Guest Chat Mode lets people address the bot with a mention even when it has not been added to the chat.
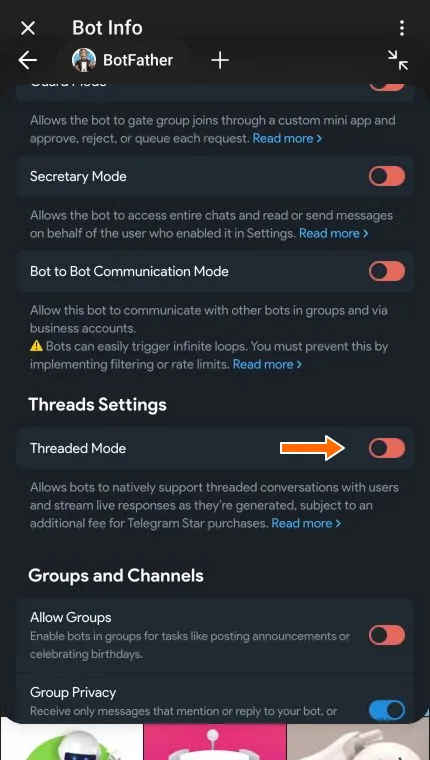
- Guard Mode lets the bot screen group join requests through its own Mini App. It can approve, decline, or queue requests.
- Secretary Mode lets people connect the bot to their account as an assistant. It can read selected conversations and reply on their behalf within the permissions they grant. The account owner chooses which chats the assistant can access.
- Bot to Bot Communication Mode allows communication with other bots in groups and through connected user accounts. The developer must prevent bots from responding to one another in an endless loop.
- Threaded Mode lets people organize conversations with the bot into topics and see replies as they are being prepared. This is useful for an AI assistant handling several discussions. Telegram applies an additional fee to Stars purchases for bots using this mode. Stars are Telegram’s virtual currency.
When Threaded Mode is enabled, Disallow users to create new threads appears. This setting prevents users from creating new topics themselves.
Privacy and access
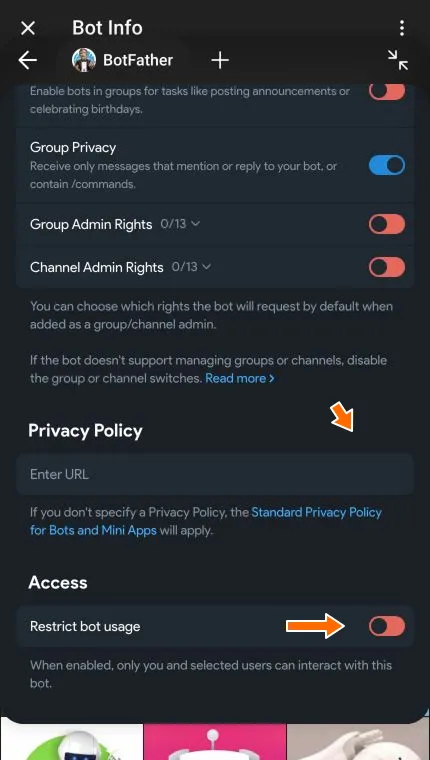
Privacy Policy lets you enter a link to a document explaining how your bot handles user data. If you do not provide one, Telegram’s standard privacy policy for bots and Mini Apps applies.
Restrict bot usage limits who can use the bot. When enabled, access is limited to you and the people you select. This is useful for a personal assistant or a private test.
How to run your bot
After registration, you need to connect a program that controls the bot. You can write one for your needs or use an existing program by connecting the bot to a suitable service.
Write your own program
You can write the program yourself or work with a developer. The program defines everything the bot does. For example, a Notes Assistant could save messages and help people find earlier notes. You connect the program using the token and start it. For the bot to keep working, the program must keep running.
Use a service without coding
With a ready-made service, the program is already written. You connect your bot using its token and configure the actions through the service’s interface. Check that the service supports the features you need before choosing it.
For example, FLOWIN helps automate message forwarding between chats and channels. You can connect your own bot and set up publishing to your channel. The service can filter messages by conditions you choose, replace text, and translate messages. To publish, the bot needs permission to post in that channel.
Questions and answers
Can I create a Telegram bot for free?
Yes. BotFather registers bot accounts for free. A connected service or a developer’s work may cost extra.
Does a bot need its own phone number?
No. You create the bot from your Telegram account. It does not need a separate phone number.
Why doesn’t my new bot reply?
A newly registered bot does not process messages yet. If you have already connected a program or service, check that it is running and that it is designed to reply to that message.
Where can I find the token if I didn’t copy it?
The token is on your bot’s management page in the BotFather app. Open it by selecting the bot in the My bots list.
Do the bot’s name and username have to match?
No. The name is what people see in the chat, while the username helps them find the bot. For example, a bot named “Notes Assistant” could use my_notes_helper_bot.